
Jak malowac i konwertowac wolf ridersów (squig riders!)
First of all I want to say that there will be a lot of mistakes in this text - I will try to find some sort of grammar checker in the net but you know how does such things works - so please read it and point out all the mistakes (still I will try as hard as I can)
Also this pictures are quite big - unfortunately i have no idea how to make them smaller - if you know how feel free…
Ok so let’s start
As Avatar wrote wolfies are a very good unit and each army deserve some of those folks … I will focus here on the modeling aspect of those guys, and then add some conversions which i like a lot.

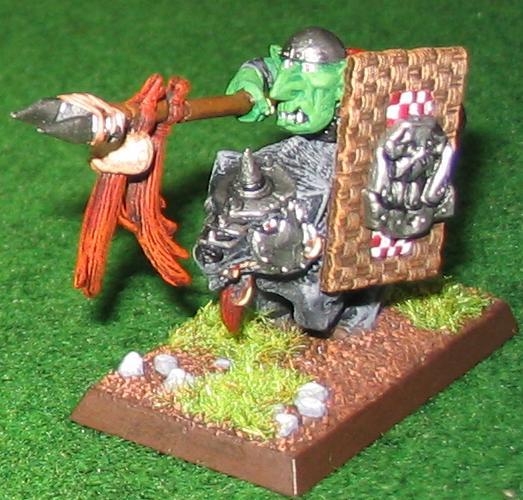
The image above shows a standard (at least for me) unit of wolf boyz. From each box you can have 2 units like this so they come in fairly good price. There is only one very small conversion it each model in this unit but i will get to it later. First i will describe as i painted this unit.
First of all i want to say that i used only basic GW colors cos I have only basic ones
I’m a guy who paints each model separately but here i made a difference. In first step i glued wolfies together and made small conversions also i glued legs and torsos together (it is good to decide which legs goes with each torso set of arms and a head before doing anything else - this will asure that you will have each model that looks different (as some heads look alike from distance)). After gluing i base coat everything with black spray.
WOLVES
I took each wolf and start to drybrusch each of them (one color for all at a time and then another color - this way you don’t need to wait for anything and you mix paint less often) - firstly i used a mix of chaos black and codex gray - it was almost black to be honest - and then i added codex gray this way that in around 4-5 stages i drybrushed wolves with pure cg paint. Then i added some white to it and highlight the most raised areas.
After that I painted each mount teeth (bestial brown till blenched bone in around 3-4 moves) claws (the same way) and eyes (big white dot and a smaller red inside), also i painted nose black and inside ears with bestial brown bleached bone (see picture) - wolves were almost done.
BASES
To finish them i glued each of them to the base and numbered them (under the base). Then i put some PVA glue mixed with water on each base and put some small stones (form zoological store) this way that they fit (one base next to the other) and then i spill the sand on the rest of the base and let it dry. Then I paint all base scorched brown and drybrush it with bestial brown with some skull white (or rather skull white with a bit of bestial - but it will look almost like bestial) and then another time with a bit more white. Stones are codex gray till skull white (around 4 moves) - it is vital to glue static grass this way each model “fits” models around him - this way it looks way better
RIDERS
I always paint models in parts (legs and torsos together - rest separately) - this time were no different. Firstly i paint things that requires drybrushing as it is a bit dirty technique and can run the parts you already painted. So clothes first. Mostly i use scorched brown (bestial brown) Black (codex gray with cb around 50/50) and red gore (blood red) (in () i wrote the color that I try to reach in drybrush layers (adding more of this color to next layer) - each in around 3-5 steps depending on a color) After that i paint skin - I very rare drybrush the skin as i find it not to look that good and i try to blend it. To be able to blend paint needs to be a bit wet when you put the next layer so it is good to paint only one thing a time (as with more the paint will dry) I started from snot green, then snot green gobbo green and then gobbo green (well I use to mix of sg and go first is 70/30 second 30/70) - of course each layer is “smaller” and I put it on higher areas. Then i use a scorpion green and gg mix for last highlights but it depends on a model (ng looks good on that - goblins only if you ad more gg than scorpion green as the second one tent to shine sometimes and it can ruin your model (the contrast between gg and sg is big))
After skin and clothes all you got to do are weapons (scorched brown and 2 layers of scorched bestial brown mix handles and boltgun metal highlighted with mithrill and inked black for metal parts (same with armor))
eyes and tooths same as wolfies (still i use blenched bone till white for gobbo nails and teeth) Hairs are black drybrushed with red gore and then with blood red last thing are shields - i think each of us paint them different - i paint mine black and then highlight with mixes of black and codex gray (unfortunately i don’t have pictures of that :/) and rest as it goes depending on mood i have (i guess)
CONVERSIONS
Well in this unit each model is converted but this isn’t anything big. Firstly I cut blades of spears and switch them with blades from NG spears - to glue them I used good’ol paper clip trick
[Paper clip trick:
take 2 things that you want to glue together and a hand drill (you can make it from crayon and 1mm drill by drilling a hole in a crayon then putting in it a drill (blunt side of course) and glue it there - mine is like that and works perfect! Drill a hole in each of the element this way that when you put them together it will form a straight line. then cut a piece of paper clip and place it in one hole (pour a glue there first) then cut it to right length pure glue on it and put it to the second hole - this way the joint will be stronger)]
also i took a skaven musician hand with bell (from NG command spure) cut that hand (it have no fur) and glue it as a hand from champions arm (the one with a hand), also i cut of the skaven symbol from the bell - it really looks cool (you can see it in the picture) This is all i can say about painting Wolf riders if you have any questions or anything feel free to ask email me PM me (which i prefer) or ask in the painting forum)
GOBBO HERO ON WOLF
Well if a want to make my wolfie unit hit hard i use one of those cheap as nothing else heroes. Personally i field him with Porko and enchanted shield so this gear was inspirational for this conversion. As far as i know there are no “official” models for this hero type so maybe you will find this idea interesting too…
Basically this is a regular goblin on wolf but with a twist. First of all I used an armored wolf head (only armored head in my army so it stands out). Then I picked a torso with Armour (from Wolf riders spure) and a head with ‘elmet (the same spure) After this came a time for shield and weapon.

I made shield from 2 gobbo shields (the one’s with the spike) I simply remove the spike from both of them and glue them together (on longer sides) then i took an glyph from orc shields and glue it this way that it covers the space between the two squares. Painting shame and the way i glue it is visible on the picture above

The weapon is a normal goblin spear with cut away blade. I used half of the banner (from gobbo spure) for decoration of the spear (simply cut it off the banner drill threw it and use paper clip trick) and a orc charioteer spear blade for the tip (i really like this one) - it is important to drill threw the decoration part and use only one paper clip do glue those 3 things together (blade, decoration, stick) as it will be much stronger - drilling this requires some practice (specially as the spear is thin) but believe me - this is possible and to be honest quite simple. Also I don’t believe that such a weapon may be glued without paper clip trick …
painting was done just as described above (shield was painted scorched brown and then drybrushed bestial brown till a mix of bestial brown and blenched bone in around 30/70 - took around 5 layers)
SQUIG RIDERS
I know many players plays NG armies only (i don’t but i was charmed by this idea) and complain about lack of wolfies in their armies. I believe this unit is a solution to that problem.

I don’t know if it looks like hard to do but believe me it is not! The hardest conversion in this unit was a musician hand so just try - it is THAT simple
Ok firstly you need to choose “good” squigs. I don’t own all models from that range so maybe there are other good squigs different from the ones on the picture - still this ones are good for sure. [as you can see only the first one is from older edition - rest is still available in online store or wherever you buy your minis]
All you got to do is take wolf riders legs (there are 2 different ones so check each on each squig!!) and try to fit them on the monster. On the picture below you can see a bit on how i fitted mine

When you find a position then you need to decide if you are going to cut off a tag or not (tag is the thing you put in the slot in the base) - with a second and fifth (from the left) i didn’t had to cut them off as i left a space in the slot’s of cav bases - it really helps gluing them
After this hard decision do what you have :P and glue legs and torso to squig. It is good to use plastic glue with a mix of some cyanopan (fast glue to everything) glue - this will melt the legs a bit and in effect it will look like a solid model not like glued one (like 1st model). Then do all conversions you like (I did swap the spear blades) and took a wolf riders musician arm and cut the instrument (without hand) and glue it to an arm meant to hold a shield (this way you have a left hand with instrument and musician still can have spear which in my taste is more important than a shield)
Rest are regular parts (from NG spure as those folks suppose to be Ng )
After all that base coat them and paint whatever you like. “gobbo parts” were painted like described above. Sguigs were blended and drybrushed (first picture shows true colors rest - i don’t know why - are to light) from chaos black mixed with reg gore threw blood red till blood red mixed with sunburst yellow) you can clearly see which parts i made brighter so i see pointless to describe it. Teeth and claws like with wolfies (eyes have black dots instead of red - i decided that it would blend to much)

Bases were made before gluing the model on them the same way as described above. I glued matches to fill the slots of cav bases (left a space for tags if i decide to left them). As you can see some squigs are in “flying” position. This is because legs fit best in such position that it was impossible to glue model differently (and it looks really really nice) - to do this simply drill a 4-6 mm hole in a model (pick a good spot (see pictures) then glue there a long paper clip piece. After that drill a hole in the base and carve a space underneath this way that it will allow you to put a paper clip threw a hole and bend it to glue it to the base underneath (it should be at least 1 cm for good joint) and a model must stand still after that (this is why the carved hole is needed (co “hide” the paper clip) - and ta-da you made it

Well this is all for today. I hope that in the near future i will be able to write about my ng conversions and gobbo ones. I will be happy if you reply to this just by saying “i read it” - this way i will know that it is actually helpful for someone.
If you have any questions comments constructive criticism or whatever feel free to post them here or contact me whatever means you want
- Anayam Ka'Leith